
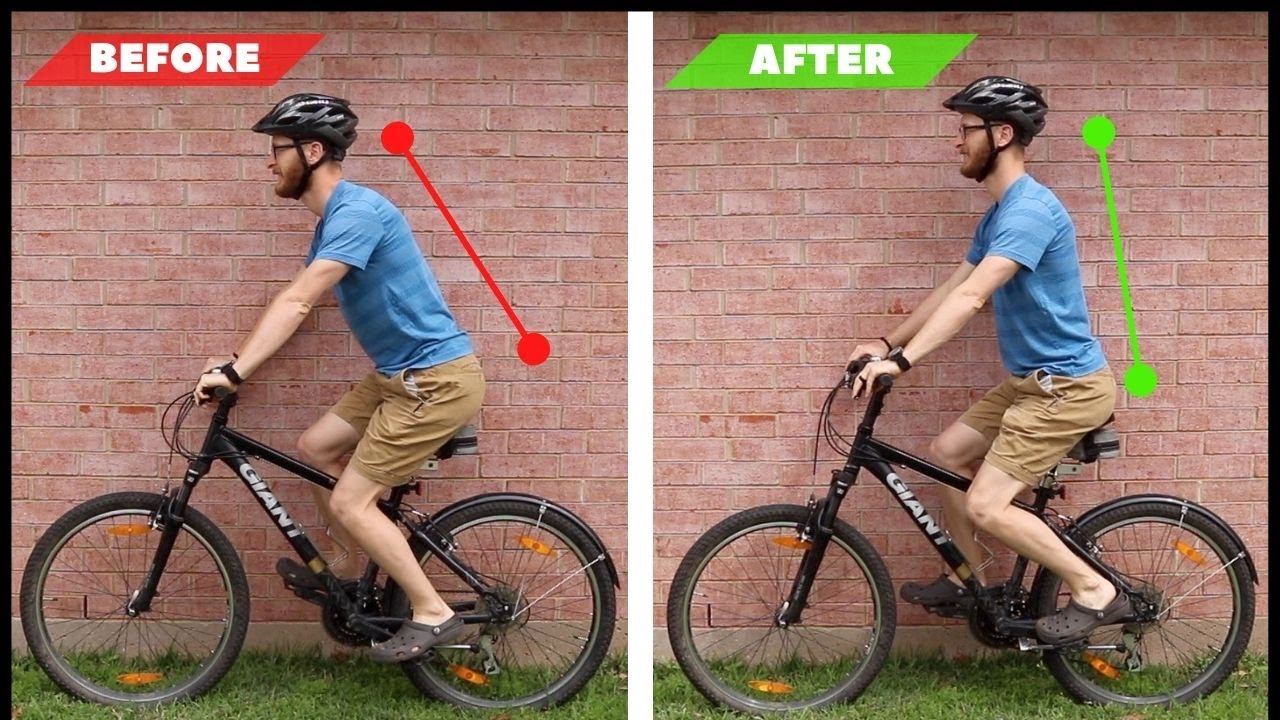
Okay, so my bike handlebars felt kinda off lately. Like, my wrists were bugging me after a ride, and I felt too stretched out. Figured it was time I actually tried adjusting the handlebars myself instead of just dealing with it.
Getting Started
First thing, I needed some tools. Dug around my toolbox and found my set of Allen keys, you know, those L-shaped wrench things. Pretty sure most bikes use these for the handlebars. I took a look at my bike’s stem – that’s the part connecting the handlebars to the frame tube. Mine looked like the newer kind, not the old style with one big bolt on top going down into the frame.
So, I saw there were bolts on the front holding the handlebar itself, and two bolts on the side clamping the stem onto the steerer tube (the tube coming up from the fork).
Doing the Adjustment – Angle First
I decided to tackle the angle first, see if just tilting the bars back a bit would help my wrists.
- I located the bolts on the faceplate – the little plate right on the front of the stem holding the handlebars. Usually four bolts there.
- Slowly, I started loosening these bolts. Didn’t take them all the way out, just loosened them enough so the handlebar could move. I tried to loosen them a bit evenly, like in a crisscross pattern.
- Once loose, I could rotate the handlebars up or down. I tilted them back towards me just a little bit.
- Finding a spot that felt better, I started tightening the faceplate bolts back up. Again, did it evenly, a little bit on each bolt, going crisscross, so the pressure was spread out. Didn’t want to overtighten and break anything, just snugged them up good and tight.
Tackling the Height (or Stem Angle)
The angle helped a bit, but I still felt too stretched out. My stem was angled slightly upwards, and I thought maybe flipping it upside down could lower the bars. Some stems you can just flip.
This part looked a bit more involved. Here’s what I did:
- First, I loosened the two side bolts on the stem, the ones clamping it to the round steerer tube. Just loosened, didn’t remove.
- Then, I loosened the bolt on the very top cap, the one sitting on top of the steerer tube. Loosened this one quite a bit.
- With those loose, I could carefully slide the whole stem and handlebar assembly off the top of the steerer tube. Had to watch out for the cables!
- I flipped the stem over, so it angled downwards instead of upwards.
- Then I slid it back onto the steerer tube. There were some spacer rings on the tube, I just put the stem back on top of them.
- Put the top cap back on and put its bolt back in. Now, this part seemed important: I tightened the top cap bolt first. Not super tight, just enough so that if I held the front brake and rocked the bike, there was no back-and-forth clunking or play in the headset (the bearings that let you steer). But it still had to steer smoothly, not stiffly. Took a couple of tries to get that feel right.
- Once the top cap felt right, I made sure the handlebars were lined up straight with the front wheel. Stood over the bike and eyeballed it carefully.
- Finally, I tightened those two side bolts on the stem really securely. These are the ones that really hold everything in place so you can steer safely. Tightened them bit by bit, alternating between them.
Checking Everything
Gave the handlebars a good push and pull to make sure nothing was loose. Checked the alignment again. Everything seemed solid.
Took it for a quick spin around the block. Felt way better! Lower handlebars, slightly tilted back. Much more comfortable on my wrists and back. Didn’t feel like I was reaching so far anymore. Might fine-tune the angle a tiny bit more later, but for a first try adjusting it myself, pretty happy with how it turned out. It wasn’t as complicated as I thought it might be, just needed the right Allen keys and to take it step-by-step.


