")
Alright, so I finally got around to trying out these Carmelo Braids I’ve been seeing, or at least, that’s what I’m calling them. Figured it was time for a new look, and I was feeling ambitious, you know?
Getting Started with the Prep
First things first, I had to get my hair ready. This is always the big step, isn’t it? I washed it real good, then spent what felt like an age detangling. Seriously, my comb and I had a proper battle. Once that was done, I made sure I had all my gear laid out: a good comb for parting, some edge control stuff, and a whole bunch of little rubber bands, just in case.
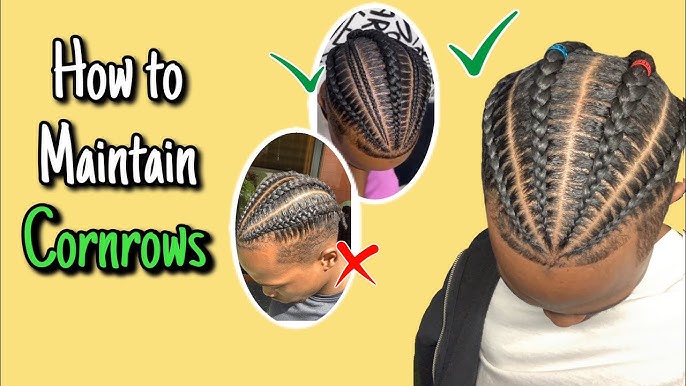
I’d looked at a few pictures online to get the idea. The Carmelo Braids, in my mind, are these neat, kinda straight-back cornrows, but they look a bit thicker and really defined. That was the goal, anyway.
The Actual Braiding Process – Oh Boy
So, I started by trying to section my hair. This is where things usually get tricky for me when I’m doing my own hair. I wanted those super clean parts you see on other folks.
- I parted the first section, right at the front. Tried to get it as straight as possible. Not as easy as it looks, especially when you can’t see the back of your own head.
- Then, I grabbed a small piece of hair at the hairline and began the cornrow. The idea was to keep it tight to the scalp.
- My fingers already started to feel a bit clumsy. I kept telling myself, “small, even sections of hair added each time.”
- The “Carmelo” part I was aiming for was that consistent thickness. So, I tried to pick up the same amount of hair each time I added to the braid.
I worked my way back, one braid at a time. My arms, man, my arms were burning from being held up for so long! I had to take a few breaks, shake them out. I think I dropped the comb about five times. And the gel? Got a bit everywhere.
The braids on the side were a bit easier because I could see what I was doing in the mirror. But the ones going straight back? Pure guesswork for a lot of it. I just hoped they were going in the right direction and weren’t all wobbly.

This whole thing took way longer than I expected. I blocked out a couple of hours, but it was more like double that. My neck was stiff, and I was seriously questioning my life choices around the halfway mark.
The Big Reveal and Final Thoughts
Finally, after what felt like an eternity, the last braid was done. I was almost too scared to look properly. I grabbed my hand mirror to check out the back.
Okay, so they weren’t perfectly salon-quality. Some parts were a bit wonky, and they weren’t all exactly the same thickness. One side definitely looked a bit neater than the other – story of my life when I do my own hair. But, you know what? They were recognizably Carmelo Braids! They were neat enough, and from the front, I was actually pretty pleased.
They felt a bit tight at first, that usual new-braid feeling, but not too bad. It’s definitely a style, and it’s pretty low maintenance once it’s in, which is what I was after. I learned that getting those super sharp parts is an art form, and I need more practice. Or maybe just an extra pair of hands next time.
Overall, I’m calling it a win. It was a proper mission, but I did it. Will I try Carmelo Braids again? Yeah, I think so. Maybe I’ll get even better next time. For now, I’m just going to enjoy not having to fuss with my hair for a bit!


