
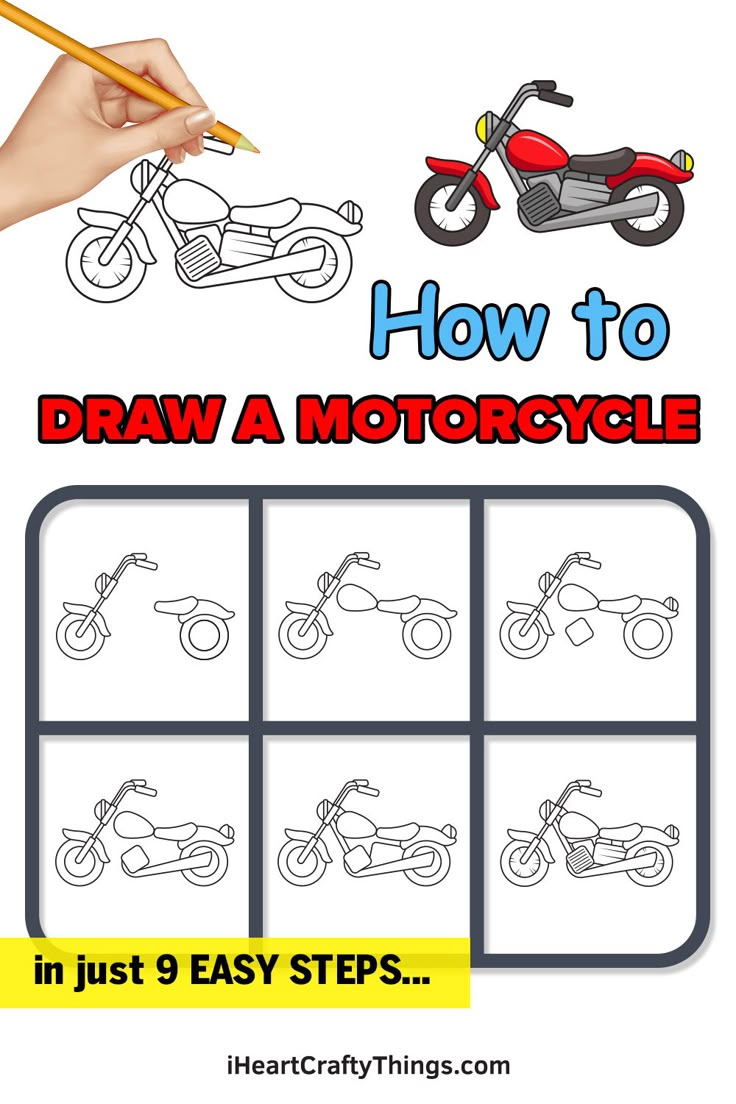
So I decided to try drawing a motorcycle today, right? Figured it’d be a good thing to tackle since I always mess up vehicles. Heard it was supposed to be easy for beginners, so let’s see. Grabbed my sketchbook, a regular HB pencil, and a decent eraser. Nothing fancy, just stuff I had lying around.
Getting Started Was Awkward
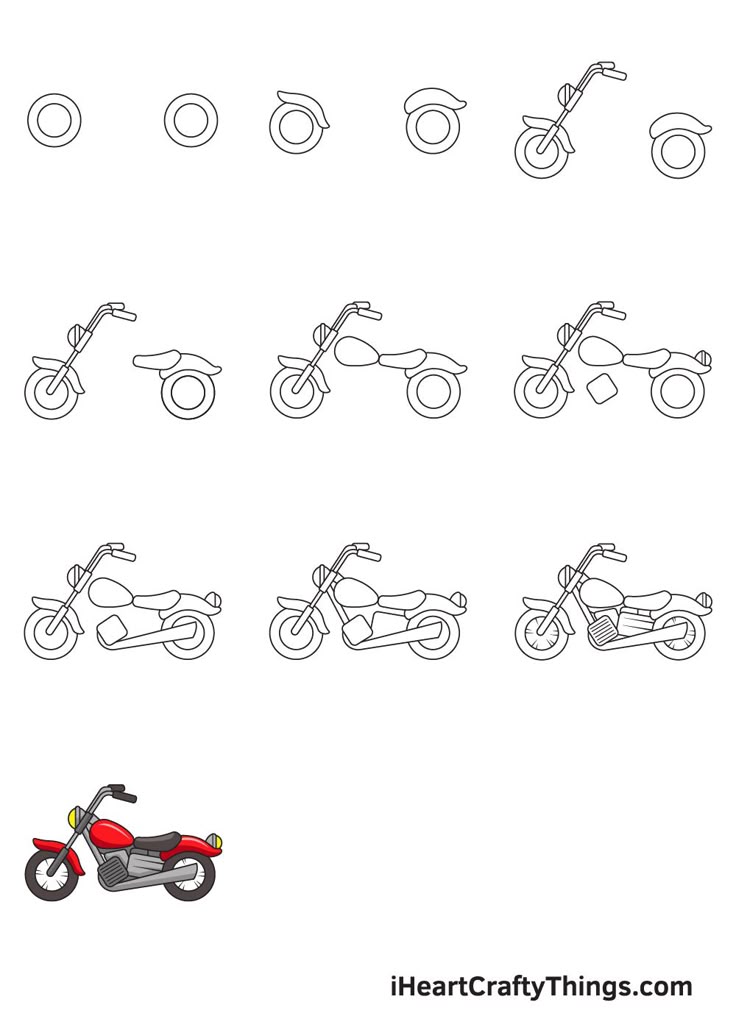
Honestly, staring at the blank page felt weird. Where do you even begin with a motorcycle? I looked at a simple reference photo on my phone – a basic chopper style. Okay, I started by scribbling a horizontal line for the ground. Then, kinda hesitantly, I drew two circles roughly where the wheels should be. They weren’t perfect circles, more like lumpy potatoes, but whatever, gotta start somewhere.
Building the Frame
After the potato wheels, I tried connecting them with a long, thin rectangle shape for the bottom part of the frame. This felt stupid. Motorcycles don’t just float on potato-shaped wheels with a stick under them! I erased the bottom part of my stick rectangle and instead sketched a big, kinda triangular shape that started small near the front wheel and got wider slanting up towards the back wheel. That looked a bit more like a frame structure.
- Added the gas tank: Just a rounded bulge on top of that front part of the frame. Made it look a bit lumpy too, like a loaf of bread.
- Forgot the seat! Seriously, almost moved on. Remembered and slapped a simple, slightly curved rectangle shape behind the gas tank.
- Handlebar struggle: Drawing a straight line up from the front of the frame was easy. But the actual handlebar? Ended up with a wide “U” shape that looked way too thick. Erased, drew thinner lines.
Detailing (The “Easy Tips” Part)
This is where the “easy tips for beginners” bit kicked in. It wasn’t about perfect lines, more about adding simple shapes.
- The engine: Under the frame, between the wheels, I just drew a rough rectangular box with a circle on one side. Looks like engine stuff now.
- Wheel details: Inside my potato wheels, drew a smaller circle off-center for the hub, then added some straight lines radiating outwards for spokes. Didn’t count them, just made it look busy.
- Exhaust pipes: From the engine box, drew two wavy tubes snaking back along the frame to the back wheel area. Kept them messy.
- Headlight and taillight: Small circle at the front on the top tube, tiny rectangle at the back under the seat.
Fixing & Finishing
Looked it over. Man, the front forks holding the front wheel looked way too spindly compared to the rest. Made those thicker lines. Also the handlebars still looked weird. Slightly adjusted the angle to look less droopy.
Took the pencil, went over the main bits with a slightly heavier hand: the frame outline, the wheels, the gas tank, the handlebars. Didn’t try to erase all the messy construction lines – it’s a practice drawing! Added a few super basic squiggles for some engine texture. Called it done.
How It Turned Out
Is it a perfect motorcycle drawing? Heck no! The wheels are wonky, the proportions are a bit off. But you know what? It actually looks like a motorcycle! That whole “step-by-step, easy tips for beginners” thing? It kinda worked. Starting with super simple shapes felt less intimidating than trying to draw the whole complex bike at once. Focusing on just one shape at a time made it doable. Messy lines? Who cares! It got me through the drawing. If you’re scared of drawing vehicles like I was, this messy approach is worth a shot. Just start with the potatoes!


