
Okay, here’s my blog post about adding auxiliary lights to my motorcycle:
Alright, so I finally got around to adding some extra lights to my bike. I’ve been wanting to do this for a while, mostly because I do a lot of night riding and, honestly, the stock headlight just doesn’t cut it. I wanted to be more visible to other drivers, and I also wanted to see better myself. So, I started this project, and here is my full process.
Planning and Purchasing
First thing I did was figure out what kind of lights I wanted. I spent a good few hours just looking at different options online. There are so many choices – LED bars, small spotlights, those fancy ones that change color… it’s crazy! I finally settled on a pair of small, round LED spotlights. They seemed like a good balance of brightness and not being too bulky.
Next, I had to decide where to mount them. I played around with a few different spots on the bike, holding the lights up to see how they’d look. I ended up choosing to mount them on my crash bars. They seemed like the most stable place, and it would give me a good spread of light.
After decided the type and location of the light, I ordered the lights, a wiring harness with a relay and switch, and some waterproof connectors. I also picked up some extra wire, zip ties, and electrical tape, just to be safe.
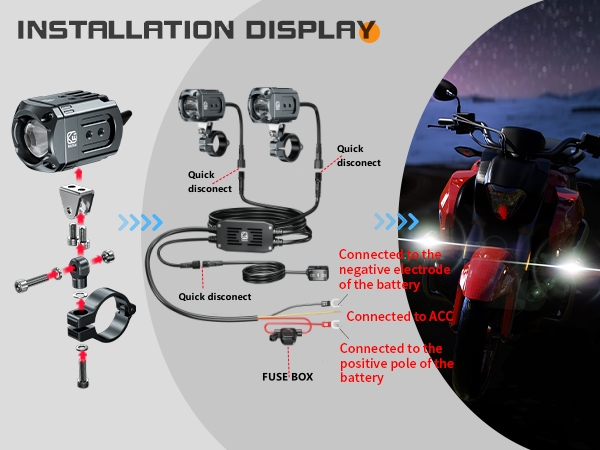
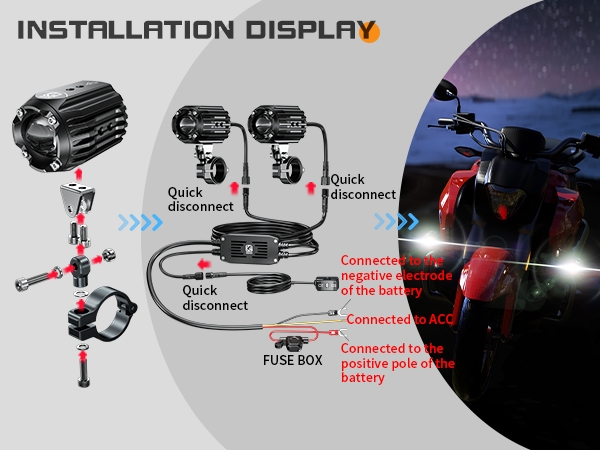
The Installation Process
The first step was disconnecting the battery. Safety first, folks! You don’t want to be messing with electrical stuff with the power on. I removed the seat and disconnected the negative terminal. Easy Peasy!

Then, I mounted the lights to the crash bars. This was pretty straightforward, just using the brackets that came with the lights. I made sure they were nice and tight, so they wouldn’t vibrate loose.
Next up, the wiring. This was the part I was most nervous about, but it turned out to be easier than I expected. The wiring harness I bought made things pretty simple. It was basically plug-and-play. I connected the lights to the harness, then ran the harness along the frame of the bike, securing it with zip ties.
- I connected the positive wire from the harness to the positive terminal of the battery.
- I found a good grounding point on the frame for the negative wire.
- I mounted the switch on my handlebars, within easy reach.
After that, I double-checked all the connections, made sure everything was tight and secure, and then reconnected the battery.
Testing and Final Touches
Time for the moment of truth! I flipped the switch, and… boom! Let there be light! They were bright, like, really bright. I took the bike for a quick spin around the block to test them out. They made a huge difference. I could see so much better, and I felt way more confident riding at night.
Finally, I spent some time adjusting the angle of the lights. I didn’t want to blind oncoming drivers, so I made sure they were aimed slightly downwards. And, I used some extra zip ties to tidy up the wiring and make sure everything was tucked away neatly.
I am super stoked about this project, I am already planning next riding in midnight.


